

Top
Author
Published
10 Jun 2026Form Number
LP2438PDF size
28 pages, 3.3 MBSubscribed to LP2438.
Thank you for your feedback.
Table of Contents
Abstract
This document provides planning and implementation guidance for deploying Proxmox Virtual Environment (VE) 9.2 on Lenovo ThinkSystem V4 servers, specifically the SR630 V4 (1U) and SR650 V4 (2U). It covers hardware prerequisites, firmware configuration, OS installation, post-installation tasks, best practices and initial cluster considerations.
This guide is intended for IT administrators, systems engineers, and solutions architects responsible for evaluating, deploying, or managing server virtualization infrastructure.
Scope and Audience
This guide is intended for IT administrators, systems engineers, and solutions architects responsible for evaluating, deploying, or managing server virtualization infrastructure. Readers are assumed to have working familiarity with Linux based server administration, enterprise virtualization concepts, and Lenovo ThinkSystem hardware. No prior experience with Proxmox VE is required, though familiarity with hypervisor platforms (VMware, Hyper-V, or similar) is beneficial.
This guide does not cover ongoing Proxmox VE administration, advanced Ceph cluster tuning, or migration from third-party hypervisors. For those topics, refer to the official Proxmox VE documentation at pve.proxmox.com and the Lenovo ThinkSystem product guides listed in the References section.
Overview
Proxmox Virtual Environment (VE) is a comprehensive, open-source server platform for enterprise virtualization, built to address the performance and scalability demands of modern IT environments. With the release of Proxmox VE 9.2 and the introduction of Lenovo’s ThinkSystem V4 server platform, organizations can take advantage of significant advances in compute density, memory bandwidth, PCIe Gen5 connectivity, and enhanced management capabilities.
The integrated, web-based user interface provides centralized control, allowing administrators to manage compute resources, configure high availability (HA) resources, and perform backup and disaster recovery operations with ease.
When deployed on Lenovo ThinkSystem V4 infrastructure, Proxmox VE 9.2 delivers tight integration of the KVM hypervisor for running Windows and Linux virtual machines (VMs), alongside Linux OS Containers (LXC) and OCI-standard application containers for lightweight workloads. It also includes built-in software-defined storage via Ceph and virtualized networking capabilities including the new SDN Fabrics feature consolidated within a single management framework.
The ThinkSystem V4 platform includes the latest Intel Xeon 6 processors, DDR5 memory with CXL 2.0 memory expansion, PCIe Gen5 I/O, and the new XClarity Controller 3 (XCC3) management engine, all of which complement Proxmox VE’s capabilities for modern virtualization workloads.
For the Lenovo ThinkSystem V3 installation guide and Proxmox 8.x, see the previous LenovoPress document LP2218.
What’s New in This Guide
In the following sections, we take a deeper in this guide:
- Updates to LP2218
- Use Cases for Proxmox VE on Lenovo ThinkSystem V4
- Small and Medium-Sized Enterprises (SMEs)
- Educational Institutions and Research Labs
- Enterprise Virtualization and VDI
- Enterprises with Open-Source Strategies
Updates to LP2218
This guide updates LP2218 for the Lenovo ThinkSystem V4 server platform and Proxmox VE 9.2. The table below summarizes the key changes.
Use Cases for Proxmox VE on Lenovo ThinkSystem V4
Proxmox VE 9.2 is well-suited to a variety of enterprise and institutional IT environments. When deployed on Lenovo ThinkSystem V4 infrastructure, it delivers a powerful combination of reliability, performance, scalability, and cost-efficiency.
Small and Medium-Sized Enterprises (SMEs)
Organizations seeking a high-value virtualization solution with minimal licensing overhead benefit from Proxmox VE’s integrated hypervisor, storage management, container support, and backup capabilities. The ThinkSystem SR630 V4’s 1U form factor with multiple processor options provide a cost-effective and density-optimized entry point.
Educational Institutions and Research Labs
Ideal for teaching, development, and testing environments. The SR630 V4 and SR650 V4 provide flexible platforms for rapid VM and container deployment. The OCI container support introduced in Proxmox VE 9.1 further simplifies deployment of standardized application workloads.
Enterprise Virtualization and VDI
The SR650 V4’s expanded GPU capacity (up to 10x PCIe Gen5 slots), support for up to 8TB of memory, and 36x NVMe drive bays make it an ideal platform for high-density VM consolidation and virtual desktop infrastructure (VDI).
Enterprises with Open-Source Strategies
Enterprises with in-house Linux expertise or a preference for open-source ecosystems find Proxmox VE 9.2 aligns well with their IT strategy. The Lenovo ThinkSystem V4 platform’s Redfish API support in XCC3 enables seamless integration with infrastructure-as-code tooling.
ThinkSystem V4 Server Platform Overview
This guide covers the installation of Proxmox VE 9.2 on both the ThinkSystem SR630 V4 (1U) and SR650 V4 (2U) servers. Both are based on Intel Xeon 6 processors and represent a significant advancement over the V3 generation.
In the following sections, we take a deeper in the Platform Overview:
ThinkSystem SR630 V4 (1U)
The Lenovo ThinkSystem SR630 V4 is an ideal 2 socket 1U rack server for high-density and scale-out workloads. It supports both Intel Xeon 6700-series processors with Performance-cores (P-cores, formerly “Granite Rapids-SP”) and Intel Xeon 6 E-core processors, providing flexibility for workloads requiring high throughput or power efficiency.

Figure 1. The Lenovo ThinkSystem SR630 V4
Key features relevant to Proxmox VE deployments:
- Up to 172 P-cores (2 x 86-core Xeon 6) per server
- Up to 32 TruDDR5 RDIMM slots; MRDIMM support (up to 8000 MHz) with Xeon 6700P processors
- CXL 2.0 memory expansion
- Up to 32x E3.S 1T front drive bays or 24x 2.5” SAS/SATA/NVMe bays
- Up to 10x rear PCIe Gen5 slots + 2x OCP 3.0 slots
- Optional Lenovo Neptune® modules for closed & open-loop liquid cooling.
- XClarity Controller 3 (XCC3) with Redfish REST API, and faster HTML5 interface.
ThinkSystem SR650 V4 (2U)
The Lenovo ThinkSystem SR650 V4 is a versatile 2 socket 2U rack server optimized for enterprise workloads including virtualization, databases, hybrid cloud, and analytics. The SR650 V4 is based on Intel Xeon 6500/6700-series P-core processors and offers significantly expanded storage, memory, and PCIe expansion compared to the 1U SR630 V4..
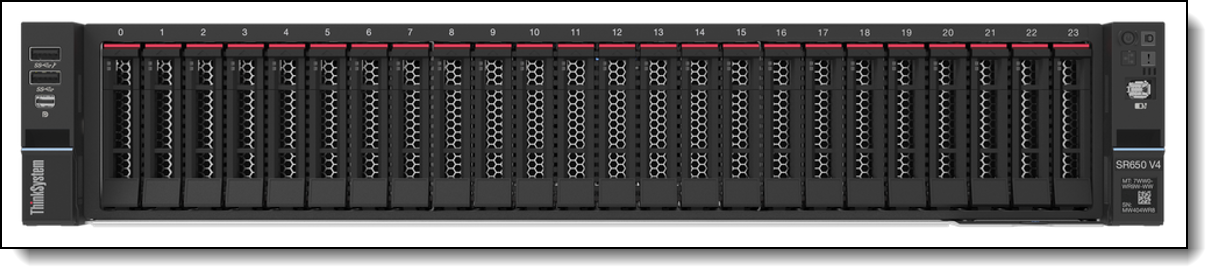
Figure 2. The Lenovo ThinkSystem SR650 V4
Key features relevant to Proxmox VE deployments:
- Up to 172 P-cores (2 x 86-core Xeon 6) per server
- Up to 32 TruDDR5 RDIMM slots; MRDIMM support (up to 8000 MHz) with Xeon 6700P processors
- CXL 2.0 memory expansion
- Up to 32x E3.S 1T front drive bays or 24x 2.5” SAS/SATA/NVMe bays
- Up to 10x rear PCIe Gen5 slots + 2x OCP 3.0 slots
- Optional Lenovo Neptune® modules for closed & open-loop liquid cooling
- XClarity Controller 3 (XCC3) with Redfish REST API, and faster HTML5 interface.
V3 to V4 Platform Comparison
The following table lists comparable V3 to V4 features.
Proxmox VE 9.0-9.2 Overview
Proxmox VE 9.0, based on Debian 13 “Trixie” running Linux kernel 6.14.8, was officially released on August 5, 2025, marking a significant milestone for the platform. This release introduced major advances in storage management, high availability, software-defined networking, and the management interface. Proxmox VE 9.1 followed in November 2025 with further enhancements to container support and VM security. Proxmox VE 9.2 was released on May 21, 2026 and introduced Dynamic Load Balancing via the Cluster Resource Scheduler, Linux kernel 7.0, QEMU 11.0, ZFS 2.4, and expanded SDN fabric protocols including WireGuard and BGP.
In the following sections, we take a deeper in the Proxmox VE 9.2:
What’s New in Proxmox VE 9.2
Administrators upgrading from Proxmox VE 8.x will find the following notable changes and new capabilities:
- Core Platform Updates
- Storage Enhancements
- High Availability (HA) Improvements
- Software-Defined Networking (SDN) Enhancements
- OCI Container Support
- VM Security Enhancements
- Monitoring and Metrics
Core Platform Updates
- Debian 13.5 “Trixie” with Linux kernel 7.0 and improved hardware compatibility for the ThinkSystem V4 platform
- QEMU 11.0 (latest KVM/QEMU virtualization stack)
- LXC 7.0 (container runtime)
- ZFS 2.4 (includes RAIDZ expansion support)
- Ceph Tentacle 20.2.1
- GlusterFS storage support removed (unmaintained upstream), migrate to alternative storage before upgrading
Storage Enhancements
- VM snapshots on thick-provisioned LVM shared storage (iSCSI, FC-based SANs) via volume chains (Technology preview)
- QEMU 11.0 (latest KVM/QEMU virtualization stack)
- Directory, NFS, and CIFS storage also gain snapshot-as-volume-chains support (Technology preview)
- ZFS 2.4 RAIDZ expansion: add new drives to existing RAIDZ pools with minimal downtime
- Parallel restore from Proxmox Backup Server for faster recovery times
High Availability (HA) Improvements
- New HA Manager Arm/Disarm to temporarily suspend the HA stack during maintenance
- New Dynamic Load Balancing with Cluster Resource Scheduler (CRS)
- HA Resource Affinity Rules replace the previous HA Groups model
- Node Affinity: pin specific VMs or containers to preferred physical nodes
- Resource Affinity: keep co-dependent VMs/CTs together (positive affinity) or spread them across nodes (negative affinity)
- Automatic migration of existing HA Group configurations during upgrade to 9.x
Note: For Proxmox clusters deployed across multiple ThinkSystem V4 nodes, HA Affinity Rules provide more granular workload placement control than was possible with HA Groups in PVE 8.x.
Software-Defined Networking (SDN) Enhancements
- New WireGuard and BGP fabric protocols
- SDN Fabrics: build complex routed network topologies (spine-leaf, full-mesh) with minimal configuration
- Support for OpenFabric and OSPF dynamic routing protocols
- EVPN underlay and full-mesh network support for Ceph inter-node traffic
- Network interface alternative name support and improved VLAN/bond handling
Note: SDN Fabrics is particularly valuable in multi-node ThinkSystem V4 clusters using dual OCP 3.0 high-speed NICs for east-west cluster traffic separation.
OCI Container Support
- Native support for Open Container Initiative (OCI) images for LXC containers
- Pull OCI images directly from registries or upload manually as LXC templates
- Supports both full system containers and lean application containers (minimal footprint microservices)
VM Security Enhancements
- vTPM state stored in qcow2 format, enabling full VM snapshots with active vTPM across NFS/CIFS/LVM storages
- Improved support for nested virtualization (Virtualization based Security / VBS for Windows VMs)
- Fine grained QEMU guest agent API privileges (separate Sys.Audit, Sys.Modify, and root-only commands)
Monitoring and Metrics
- New node metrics: CPU, I/O, and memory pressure stall information
- ZFS ARC memory usage integrated into node graphs
- Extended RRD resolution: per-minute, per-30-minutes, per-6-hours, weekly
- OpenTelemetry OTLP/HTTP support for integration with external observability platforms
Hardware Used for This Installation Guide
The following hardware configurations were used for this guide. The SR630 V4 was used for primary step-by-step installation validation; the SR650 V4 configuration is documented as an alternate deployment option. For the current complete list of Lenovo servers tested with Proxmox VE, refer to the Lenovo OS Interoperability Guide (OSIG).
Primary Test Configuration
Note: The SR630 V4 test system contained E-core processors, but Lenovo recommends P-core based systems for the best performance.
Alternate Configuration
Prerequisites and System Requirements
Prerequisites and System Requirements
Before deploying Proxmox VE 9.2 on Lenovo ThinkSystem V4 infrastructure, ensure the following hardware, firmware, and software requirements are met.
Hardware Requirements
- Server Platform: Lenovo ThinkSystem V4 servers (SR630 V4, SR650 V4, or other V4 models listed on the Operating System Interoperability Guide - OSIG)
- Processor: Intel Xeon 6 P-core or E-core processors (virtualization support enabled by default) • Memory: Minimum 16 GB RAM; 32 GB or more recommended; 64 GB+ if using ZFS or Ceph
- Storage: One or more NVMe, SATA, or SAS drives; NVMe based ZFS RAID1 mirror recommended for OS boot
- Network Interface: Minimum 1 x 1GbE (management); 2 or 4 x 10/25GbE or higher strongly recommended for production VM traffic and cluster heartbeat
XCC3 Firmware and Management
- Update to the latest firmware: XCC3, UEFI, and LXPM from Lenovo Support
- XClarity Controller 3 (XCC3): Premier license recommended for remote KVM console and virtual media capabilities
- XCC3 supports full Redfish REST API which is usable for PXE/automation-based deployments
Note: XCC3 replaces XCC2 on V4 servers. It features a significantly improved HTML5 remote console, faster boot times, and enhanced Platform Resource Manager telemetry. The setup workflow is largely unchanged from XCC2.
UEFI Configuration
The following UEFI settings should be verified or configured before installation. These settings are accessible via LXPM by pressing F1 during POST:
Secure Boot
- Verify Secure Boot is enabled prior to Proxmox VE 9.2 installation if your environment's security policies permit or require it
- Proxmox VE 9.2 supports UEFI Secure Boot through Debian 13 Trixie's signed bootloader chain, making it the recommended configuration for environments requiring firmware level boot integrity validation
Note: Proxmox VE 9.2 with Debian 13.5 Trixie has improved Secure Boot support compared to earlier releases.
Operating Mode
- Set System Operating Mode to Maximum Performance for production virtualization workloads
- For power-constrained environments or E-core processor deployments, Efficiency Favor Power mode may be appropriate
Virtualization Extensions
- Verify Intel VT-x and VT-d (IOMMU) are enabled (default on ThinkSystem V4 platforms)
- VT-d / IOMMU is required for PCIe device passthrough to VMs (e.g., GPU passthrough, NIC passthrough)
Storage Considerations for ZFS
- Do not use ZFS on top of hardware RAID controllers with their own cache management. ZFS requires direct access to underlying drives
- For M.2 boot drives with HW RAID: use the ThinkSystem M.2 RAID B550x series enablement kit Adapters for mirrored OS boot
- Use 940-8i/16i series cards for HW RAID on non-ZFS data drives
- Use 440-8i/16i SAS HBAs for SW RAID via ZFS. ZFS is generally preferred for its snapshot, scrub, and self-healing capabilities
- With Proxmox VE 9.2, RAIDZ pool expansion (adding drives) is now supported natively
Software Requirements
- Installation Media: Proxmox VE 9.2 ISO from Proxmox
- ISO mount via XCC3 virtual media • Alternative method with Bootable USB Utility: Rufus (Windows) or dd (Linux)
- Web Browser: Chrome, Firefox, or Edge (for Proxmox web GUI and XCC3 HTML5 console)
Networking and Access
- Static IP address for Proxmox VE management interface
- Hostname, DNS server, subnet and default gateway information
- XCC3: Static IP for out-of-band remote access, provisioning, and troubleshooting
- Optional: Internet access for package updates
- Optional: Separate network segments for VM traffic, cluster heartbeat, and storage (recommended for production)
Prepare Installation Media
In the following sections, we take a deeper in the Installation Media:
Option 1: XCC3 Virtual Media (Remote ISO Mount)
This method is preferred for remote deployments and does not require physical access to the server.
- 1. Download the Proxmox VE 9.2 ISO from Proxmox
- 2. Log into XCC3 via web browser at its configured IP address. Default IP (if no DHCP): 192.168.70.100. Default credentials: USERID / PASSW0RD (change immediately after first login).
- 3. Navigate to Remote Console and launch the HTML5 remote KVM session.
- 4. In the remote console, click Media → Activate to enable virtual media mounting.
- 5. Click Browse and select the downloaded Proxmox VE 9.2 ISO image.
- 6. Click Mount all local media to attach the ISO as a virtual CD/DVD.
- 7. Return to the Remote Control session and power on (or restart) the server.
- 8. Press F12 at POST for One Time Boot Device and select XCC Virtual Media.
Note: XCC3 on ThinkSystem V4 servers offers a noticeably faster and more responsive HTML5 KVM console compared to XCC2. The virtual media mount workflow is unchanged from previous generations.
Option 2: Bootable USB Drive
This method requires physical access to the server.
- 1. Download the Proxmox VE 9.2 ISO from Proxmox
- 2. Create a bootable USB drive using Rufus (Windows) or dd (Linux). In Rufus, select “DD Image” write mode when prompted.
- 3. Boot from USB via F12 (One Time Boot Device selection) during POST.
- 4. Select the USB device from the UEFI Boot Devices Manager.
Note: Windows will not be able to access the USB drive letter after Rufus writes the Proxmox image in DD mode. This is expected behavior.
Proxmox VE 9.2 Installation
The following are the installation steps:
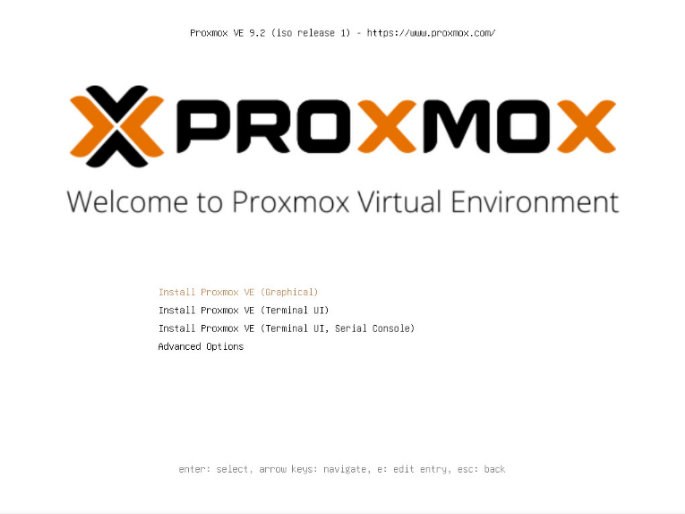
Note: The Proxmox VE 9.2 graphical installer is largely unchanged from 8.x.
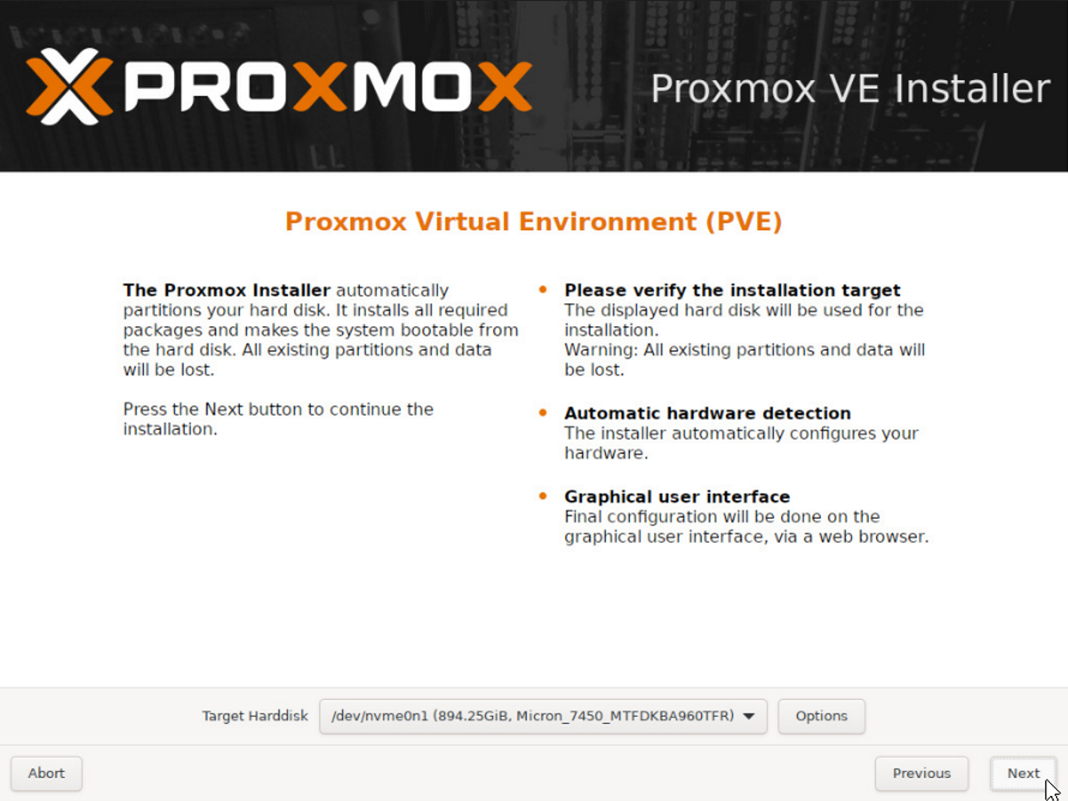
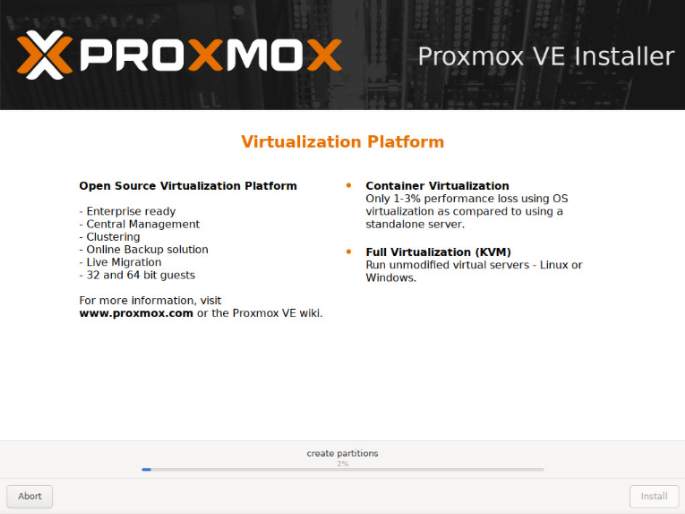
- At the Proxmox VE boot menu, select Install Proxmox VE (Graphical)”.
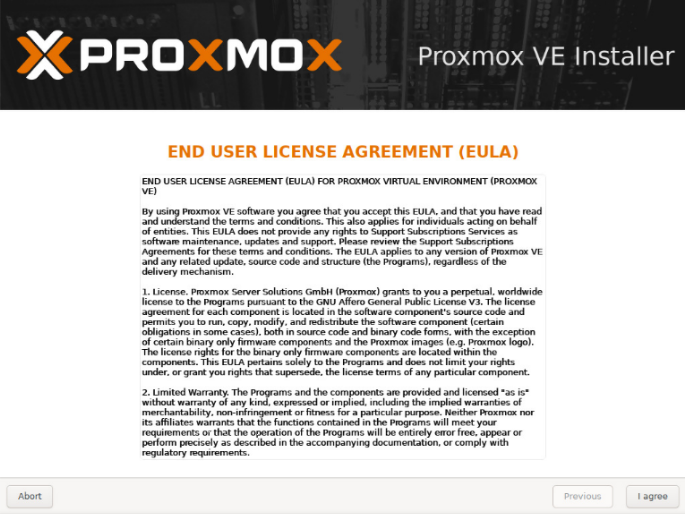
- Accept the End User License Agreement (EULA).
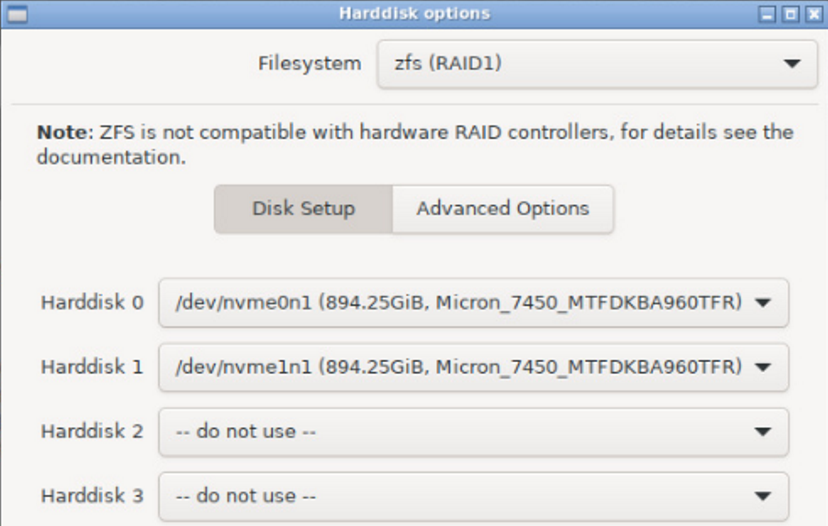
- Select your target installation drive(s). Click Options to configure ZFS RAID settings.
- For a ZFS RAID1 (mirrored) OS installation across two non-hw RAID M.2 NVMe drives: select ZFS RAID1 and choose both M.2 drives. This provides OS drive redundancy without requiring a hardware RAID adapter for the boot volume.
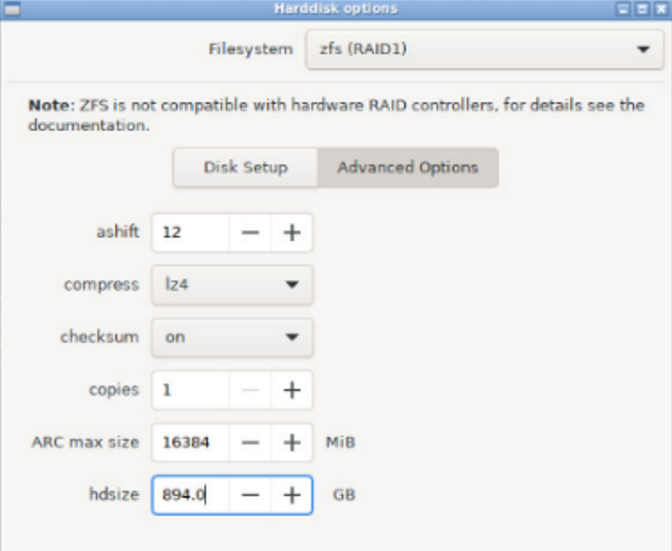
- In Advanced Options, enable compression with lz4 and configure the ZFS ARC cache size. Default is typically 10% of RAM. For servers with less than 64GB RAM, consider reducing ARC to 4096–8192 MB to reserve more memory for VM workloads.
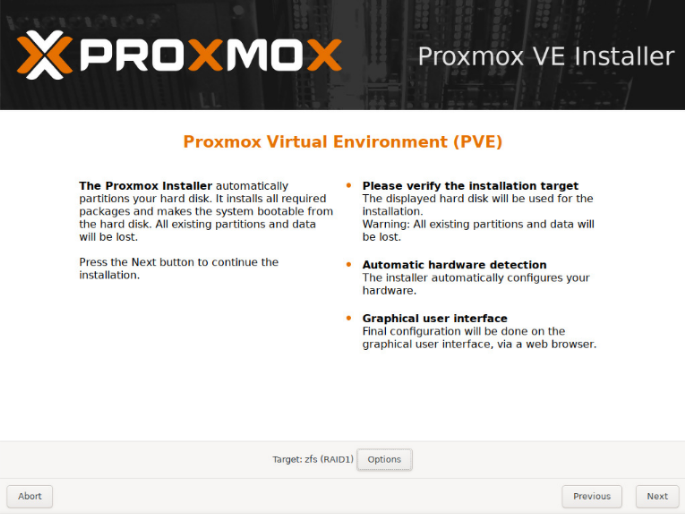
- Click OK and then Next to proceed.
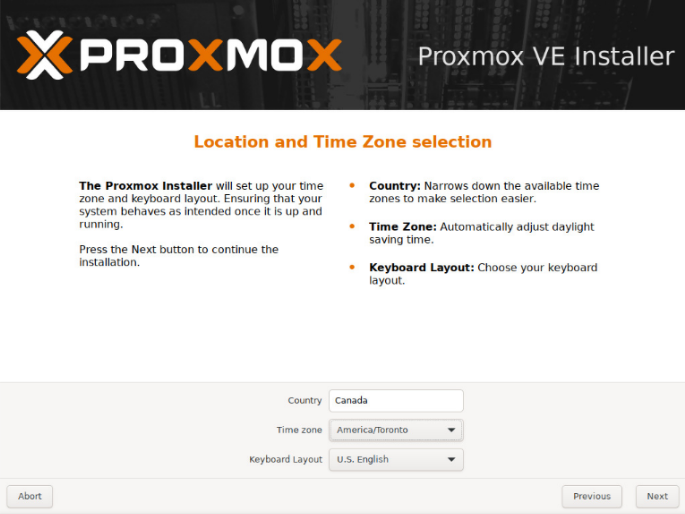
- Set Location, Time Zone, and Keyboard Layout.
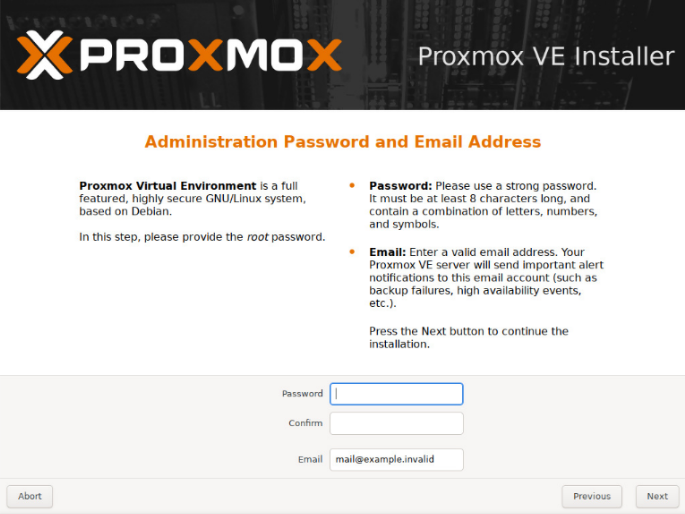
- Set the root administrative password and a contact email address for system alerts.
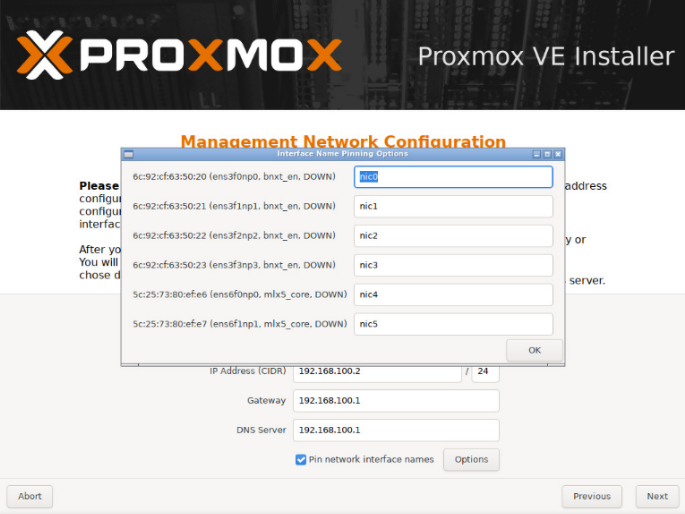
- Select the primary network interface for Proxmox management. Set the hostname (FQDN format recommended, e.g., pve01.domain.local) and IP addressing.
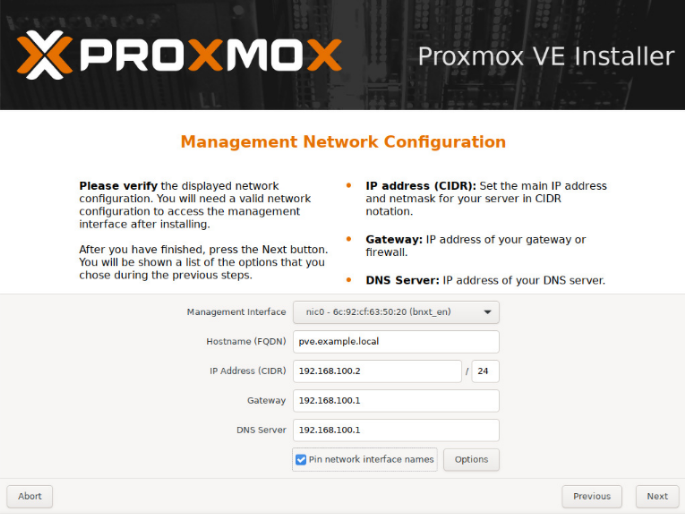
Figure 11. Set the hostname and IP addressing
Note: If the server contains multiple NICs, it’s easier to only physically connect the active port to a switch during installation for easier identification. Alternatively verify NIC ports via the XCC3 inventory view. - Proxmox now offers the ability to pin network interface names directly through the installation interface.
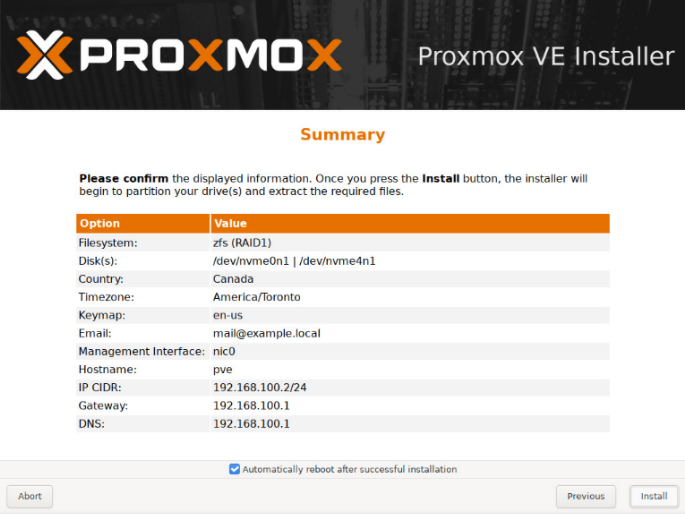
- Review the Summary screen.
- Click Install to continue the installation.
- After the installation completes, note the Proxmox management URL displayed on screen. (The default management port is 8006)
- Access Proxmox VE via browser: https://:8006 and log in with root and the password configured during installation.
Post-Installation Tasks
In the following sections, we take a deeper dive in the Post-Installation Tasks:
Apply System Updates
Before configuring storage or creating VMs, apply all available updates:
- Via Web GUI: Navigate to Node → Updates → Refresh, then Upgrade
- Via CLI: apt update && apt full-upgrade -y
If using a Proxmox subscription, configure the Enterprise repository. Without a subscription, configure the no-subscription repository (suitable for non-production or evaluation environments).
Configure Additional Storage
After the OS is installed on the M.2 boot drives, configure additional NVMe or SAS/SATA data drives for VM and container storage. The procedure below uses ZFS for maximum flexibility:
- In the Proxmox web GUI, navigate to Datacenter → [Node] → Disks to view unconfigured local disks.
- If the disks may have previously contained data, it is recommended to first wipe each disk. This operation destroys any previous data on the drive.
- Under Disks → ZFS, select Create: ZFS.
- Select the drives to include in the new ZFS pool (e.g., NVMe data drives).
- Assign a pool name, select RAID level (RAIDZ, RAIDZ2, or mirror depending on drive count and redundancy requirements), and enable compression (lz4 recommended).
- Enable the Add Storage checkbox to automatically register the pool with Proxmox storage.
- Click Create. The new pool is immediately available for VM disk and container storage.
- Verify via CLI: zpool status
Note: With Proxmox VE 9.2 and ZFS 2.4, RAIDZ pool expansion is now supported natively. You can add additional drives to an existing RAIDZ pool without destroying and recreating it, significantly improving operational flexibility for growing storage needs on ThinkSystem V4 platforms.
Configure XCC3 OS Watchdog
The XCC3 OS Watchdog monitors the Proxmox host’s OS state and can automatically restart the server if Proxmox becomes unresponsive (hang or failure scenarios). This is an important reliability feature for production deployments.
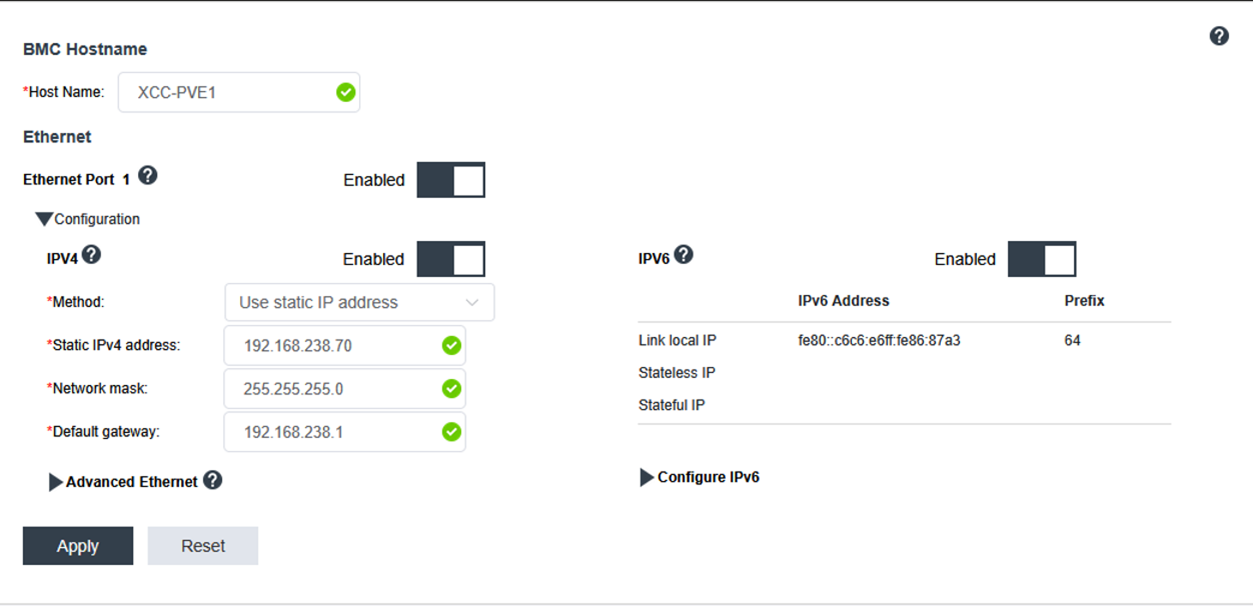
- In the XCC3 web GUI, navigate to BMC Configuration → Network.
- Define the BMC hostname and click apply.
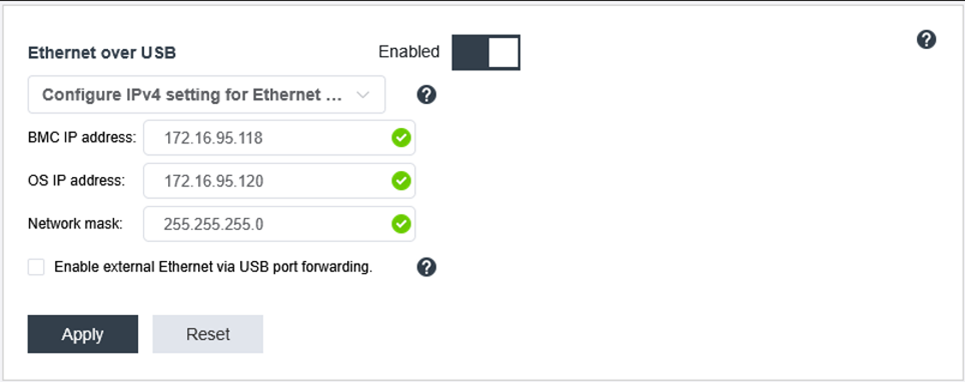
- Scroll to the Ethernet over USB section and enable it.
- Choose Configure IPv4 settings for Ethernet over USB.
- Select a private IP subnet address for the BMC and the OS (default is 172.20.95.x on XCC3) and click Apply.
- The OS IP address is the address the XCC3 will ping to verify OS liveness.
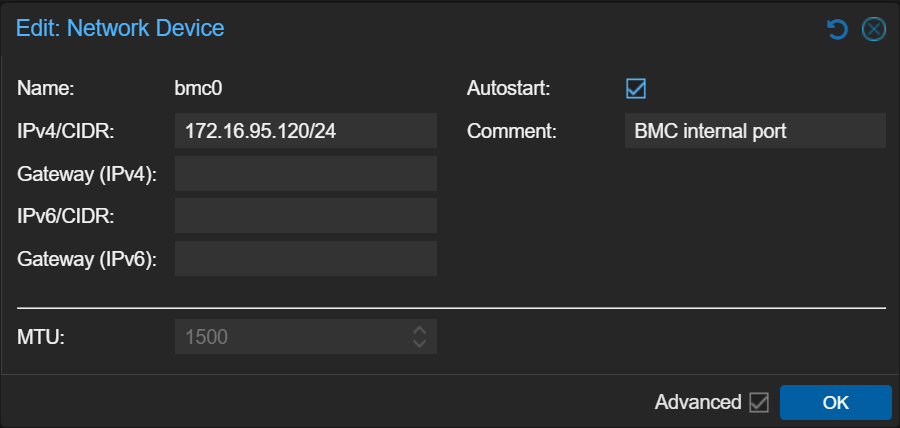
- In the Proxmox web console, navigate to System → Network. Locate the XCC/BMC network. Edit the interface and enter the OS IP configured in the XCC3.
- Enable Autostart. Click OK.
- Apply the new network configuration.
- Verify connectivity from the Proxmox host CLI: ping
- In the XCC3 web GUI, navigate to Server Configuration → Server Properties. Configure the OS watchdog timeout (minutes before automatic reboot when OS IP stops responding) and click Apply.
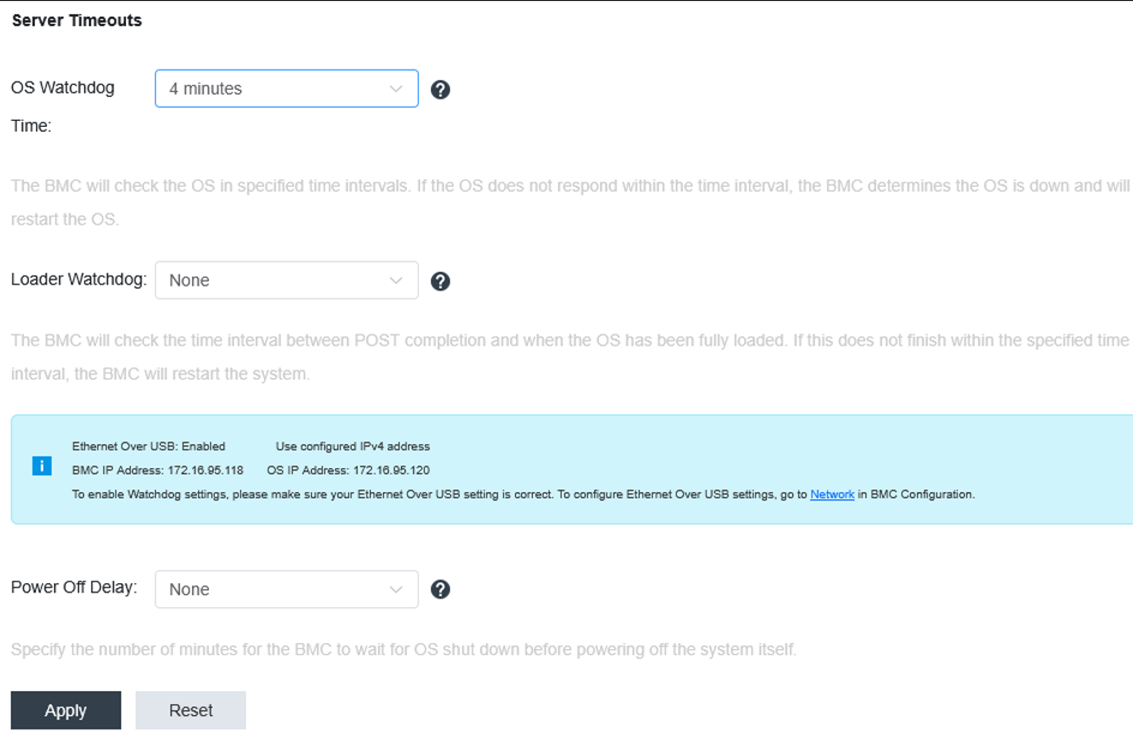
Figure 18. Configure the OS watchdog timeout
Note: The Ethernet over USB interface appears as a standard Linux network device in Proxmox. The XCC3 uses it to independently verify OS health regardless of the server’s primary network configuration.
Cluster Setup Considerations for Multi-Node Deployments
For deployments using multiple ThinkSystem V4 nodes as a Proxmox cluster, consider the following with Proxmox VE 9.2:
- HA Affinity Rules: configure Node Affinity and Resource Affinity rules to control VM placement across V4 nodes based on workload characteristics
- Enable CRS dynamic scheduling mode to automatically rebalance HA-managed VMs across V4 nodes based on real-time CPU and memory utilization
- SDN Fabrics: use the new Fabrics feature for inter-node cluster networking if deploying a spine-leaf or routed topology with the SR650 V4’s multiple NIC options
- Ceph: with up to 24 front facing drive bays, the SR650 V4 makes it well-suited for hyper-converged Ceph deployments
- Dual OCP slots: both the SR630 V4 and SR650 V4 include dual OCP 3.0 slots as standard, enabling dedicated cluster heartbeat and storage traffic NICs
Other Recommended Post-Installation Tasks
- Create Virtual Machines and LXC Containers
- Configure Backup Jobs (Proxmox Backup Server)
- Configure Role-Based Access Control (RBAC) for multi-tenant environments
- Enable Active Directory (AD) integration • Set up Email Notifications for alerts and job completion
- Review and implement Proxmox VE subscription plan for production environments (access to Enterprise repository and support)
- For OCI workloads (PVE 9.1+): configure OCI registry access for direct container image pulls
Summary
This guide has covered the installation and initial configuration of Proxmox VE 9.2 on Lenovo ThinkSystem V4 servers, specifically the SR630 V4 (1U) and SR650 V4 (2U). Together, these platforms provide a powerful, modern foundation for open-source virtualization deployments.
The ThinkSystem V4 platform’s Intel Xeon 6 processors, DDR5 memory subsystem, PCIe Gen5 I/O, NVMe storage, and XCC3 management engine are well-matched with Proxmox VE 9.2’s advances in storage, high availability, networking, and container support. For organizations evaluating an alternative to proprietary hypervisors, this combination delivers enterprise-grade capabilities with the transparency and flexibility of open-source software.
References
The following is a list of references:
- Lenovo ThinkSystem SR630 V4 Product Guide: https://lenovopress.lenovo.com/lp1971
- Lenovo ThinkSystem SR650 V4 Product Guide: https://lenovopress.lenovo.com/lp2127
- Introducing ThinkSystem V4 Servers with Intel Xeon 6: https://lenovopress.lenovo.com/lp2165
- Lenovo OS Interoperability Guide (OSIG): https://lenovopress.lenovo.com/osig
- Proxmox VE Downloads: https://www.proxmox.com/en/downloads
- Proxmox VE 9.2 Release Notes / Roadmap: https://pve.proxmox.com/wiki/Roadmap
- Proxmox VE Upgrade Guide (8 to 9): https://pve.proxmox.com/wiki/Upgrade_from_8_to_9
- Lenovo ThinkSystem Firmware and Drivers: https://datacentersupport.lenovo.com/
- Lenovo XClarity One: https://lenovopress.lenovo.com/lp1992-lenovo-xclarity-one
Authors
Paul Santos is a Senior Solutions Architect at Lenovo with over 30 years of experience in the IT industry. He began his career at IBM in the early days of the IBM PC Server division serving as a customer-facing Field Technical Support Specialist for complex opportunities in the Government, Financial, and Higher Ed sectors. Today, Paul works in the Lenovo Infrastructure Solutions Group as a Channel-focused SA supporting Canadian Channel partners. He leads Proof-of-Concepts, technical enablement, and Certification workshops. His areas of expertise include ThinkSystem Servers and Storage, Virtualization, Hyperconverged Infrastructure (HCI) and Edge solutions.
Why Lenovo
Lenovo is a US$83 billion revenue global technology powerhouse, ranked #196 in the Fortune Global 500, and serving millions of customers every day in 180 markets. Focused on a bold vision to deliver Smarter Technology for All, Lenovo has built on its success as the world’s largest PC company with a full-stack portfolio of AI-enabled, AI-ready, and AI-optimized devices (PCs, workstations, smartphones, tablets), infrastructure (server, storage, edge, high performance computing and software defined infrastructure), software, solutions, and services.
Trademarks
Lenovo and the Lenovo logo are trademarks or registered trademarks of Lenovo in the United States, other countries, or both. A current list of Lenovo trademarks is available on the Web at https://www.lenovo.com/us/en/legal/copytrade/.
The following terms are trademarks of Lenovo in the United States, other countries, or both:
Lenovo®
Neptune®
Smarter Technology for All®
ThinkSystem®
XClarity®
The following terms are trademarks of other companies:
Intel®, the Intel logo and Xeon® are trademarks of Intel Corporation or its subsidiaries.
Linux® is the trademark of Linus Torvalds in the U.S. and other countries.
Hyper-V and Windows are trademarks of Microsoft Corporation in the United States, other countries, or both.
Other company, product, or service names may be trademarks or service marks of others.
Configure and Buy
Please select a locale
Full Change History
Course Detail
Employees Only Content
The content in this document with a is only visible to employees who are logged in. Logon using your Lenovo ITcode and password via Lenovo single-signon (SSO).
The author of the document has determined that this content is classified as Lenovo Internal and should not be normally be made available to people who are not employees or contractors. This includes partners, customers, and competitors. The reasons may vary and you should reach out to the authors of the document for clarification, if needed. Be cautious about sharing this content with others as it may contain sensitive information.
Any visitor to the Lenovo Press web site who is not logged on will not be able to see this employee-only content. This content is excluded from search engine indexes and will not appear in any search results.
For all users, including logged-in employees, this employee-only content does not appear in the PDF version of this document.
This functionality is cookie based. The web site will normally remember your login state between browser sessions, however, if you clear cookies at the end of a session or work in an Incognito/Private browser window, then you will need to log in each time.
If you have any questions about this feature of the Lenovo Press web, please email David Watts at dwatts@lenovo.com.


