

Top
Author
Published
14 Apr 2025Form Number
LP2198PDF size
22 pages, 1.5 MBSubscribed to LP2198.
Thank you for your feedback.
Abstract
Hyper-V is Microsoft’s built-in virtualization platform for Windows. It allows users to create and manage virtual machines (VMs) directly from their Windows environment. With Hyper-V, developers and IT professionals can run different operating systems very efficiently in an isolated environment without separate hardware.
Hyper-V was first introduced with Windows Server 2008 and has evolved significantly. The release of Windows Server 2025 brings us several enhanced settings, great performance, and scalability improvements for Hyper-V. This paper introduces the features of Hyper-V, shows the significant change and the improved scalability of Hyper-V virtual machines with Windows Server 2025, and what we can benefit from a generation 2 virtual machine.
Introduction
Hyper-V is Microsoft's hardware virtualization product and allows users to create, deploy, and manage multiple virtual machines (VMs) on a single physical machine. Each virtual machine (VM) is allocated physical resources (such as CPU, memory, storage, etc.) and acts like a physical computer running operating system and programs. They are all isolated from each other. This technology plays a key role in cloud computing and server virtualization, offering many benefits to IT teams.
Hyper-V is a hypervisor-based virtualization technology. With the help of hypervisor, Hyper-V abstracts or virtualizes all the hardware resources of a physical computer and shares them across different VMs to offer integrated management and scaling for virtualized workloads. For Windows Hyper-V, hypervisors run directly on the hardware to control the physical hardware and manage guest operating systems. This architecture minimizes latency, maximizes performance, and makes each VM run entirely isolated. The physical computer on which Hyper-V runs is known as the host, while the virtual machines running on the host are known as guest VMs.
Hyper-V comes with a host of features that enhance its functionality and usability. These features are designed to improve the performance, scalability, and manageability of virtual environments. Here are some key features of Hyper-V.
- Portability - Features such as live migration, storage migration, and import/export make transfer running VMs between physical servers without downtime, ensuring uninterrupted business operations.
- Disaster recovery and backup - For disaster recovery, Hyper-V Replica creates copies of virtual machines to be stored in another physical location to restore the virtual machine from the copy. For backup, Hyper-V provides saved states and Volume Shadow Copy Service (VSS) to support.
- High Availability - Hyper-V, when used in conjunction with other Microsoft technologies like Failover Clustering, can provide high availability for the VMs. If one host fails, the VMs on that host are automatically moved to another host in the cluster, minimizing downtime.
- Security - Secure boot and shielded virtual machines help protect against malware and other unauthorized access to a virtual machine and its data. Hyper-V is used for platform security. Virtualization-based security (VBS) uses hardware virtualization and the hypervisor to create an isolated virtual environment that becomes the root of trust of the OS that assumes the kernel can be compromised. Windows uses this isolated environment to host several security solutions, providing them with increased protection from vulnerabilities and preventing the use of malicious exploits that attempt to defeat protections.
Hyper-V is built into Windows Server, which makes it a perfect and cost-effective option for organizations that already use Microsoft products. Windows Server 2025 introduces massive performance and scalability improvements with Hyper-V. Generation 2 virtual machines (VMs) in Hyper-V on Windows Server 2025 support up to 2,048 virtual CPUs and 240 TB of memory. Additionally, GPU partitioning enables shared GPU access across VMs with live migration support. Workgroup clusters provide AD-free Hyper-V clustering, making them ideal for edge deployments on ThinkSystem servers.
Enabling Hyper-V on the host machine
Hyper-V has specific hardware requirements. The general requirements are as follows:
- 64-bit processor with second level address translation (SLAT) - This helps with memory management in virtual environments, allowing for efficient allocation of memory to VMs.
- VM Monitor Mode extensions - Support for VM Monitor Mode extensions (such as Intel VT-x and AMD-V) is necessary. These processor extensions enable the hardware virtualization capabilities that Hyper-V relies on.
- Minimum 4 GB RAM - While Hyper-V can technically run with less, at least 4 GB of RAM is recommended. More memory is better. The actual amount of RAM you’ll need depends on the number and type of VMs you plan to run.
- Virtualization support enabled in BIOS/UEFI - The system’s BIOS or UEFI settings must have virtualization support enabled.
To determine whether the server meets the Hyper-V requirements or not, run the msinfo32 command and at the bottom of the displayed System Summary page, you should see the support status of the following Hyper-V requirements to be Yes.

Figure 1. Hyper-V support status on the System Summary page
If any item returns No, check the requirements listed above and make some adjustments where possible. Lenovo ThinkSystem servers that support Windows Server 2025 have enabled virtualization in UEFI by default. If “Hyper-V – Virtualization Enabled in Firmware” displays No, you can restore, save the UEFI setting, and try again.
Once we confirm that the above Hyper-V requirements are met, we can install Hyper-V in Windows Server either by Server Manager or a PowerShell command.
Here are the steps for installing Hyper-V by Server Manager in host OS:
- Open Server Manager → Add roles and features → Server Roles, check the box next to Hyper-V (installed).
- On the Features page, select next.
- On the Hyper-V page, select next.
- On the Virtual Switches page, select next.
- On the Migration page, select next.
- On the Default Stores page, select next.
- On the Confirmation page, click Install and then restart the server.
These are the instructions for installing Hyper-V by a PowerShell command in host OS:
- In the Windows search bar, type "PowerShell."
- Right-click Windows PowerShell in the search results and select Run as administrator.
- Use the following command to enable Hyper-V on your system and restart the system to make it effect:
PS> Install-WindowsFeature -Name Hyper-V -IncludeManagementTools -Restart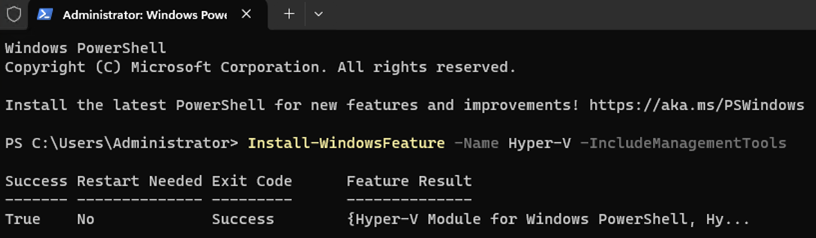
Figure 2. Install Hyper-V and management tools in Windows Server
Generation 1 VM with Windows Server 2025
Hyper-V supports the creation of both Generation 1 and Generation 2 VMs. Generation 1 VMs are essentially the first iteration of VMs and are based on the traditional BIOS firmware. This type of VM supports both 32-bit and 64-bit guest operating and doesn’t support secure boot.
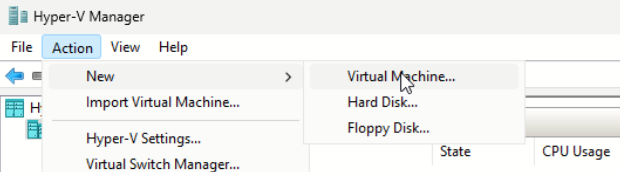
Setup using Hyper-V Manager (Generation 1)
After checking the Hyper-V requirements and installing the Hyper-V role in the host, a Generation 1 VM can be set up and configured by the following steps through Hyper-V Manager.
- Open Hyper-V Manager.
- In the Action panel, click New → Virtual Machine.
- On the Specify Name and Location page, give your VM a name, such as “VM1_WS2025_gen1”.
- On the Specify Generation page, select “Generation 1”.
- On the Assign Memory page,
- Set the startup memory (recommended: at least 4096 MB for Windows Server 2025).
- Optionally, enable Dynamic Memory.
- On the Configure Networking page,
- Select an existing virtual switch or “Not connected”.
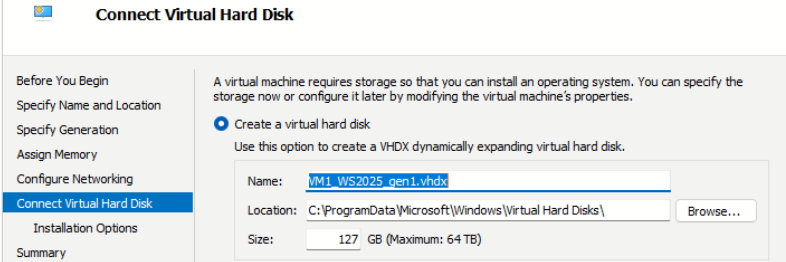
- On the Connect Virtual Hard Disk page,
- Choose Create a virtual hard disk.
- Set the size (default is 127 GB; adjust according to the host’s workloads and storage resources).
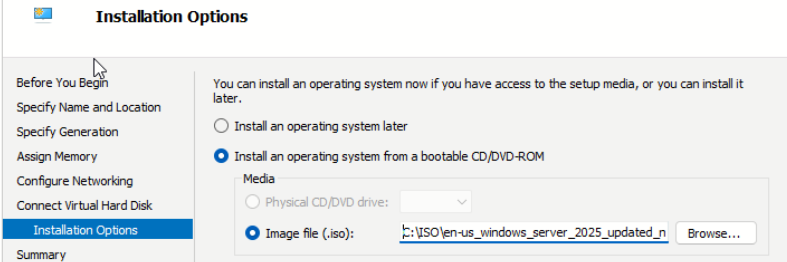
- On the Installation Options page,
- Select Install an operating system from a bootable CD/DVD-ROM.
- Browse and select the ISO image.
- On the Completing the New Virtual Machine Wizard page, a new VM is created successfully and will be listed in Hyper-V Manager.
Tip: Hyper-V Manager might fail to create a new Generation 1 VM on a system with more than 128 logical CPUs in the host with Windows Server 2025. In this situation, use PowerShell commands to create a Generation 1 VM instead. See the Setup using PowerShell (Generation 1) section.
For example, if the server is configured with two 32C CPUs and the total logic processors in the host are 128, Generation 1 VM created by Hyper-V Manager will be successful. If the server is configured with four 16C CPUs and the total logic processors in the host are 128, Generation 1 VM created by Hyper-V Manager will also be successful. However, If any increase in the number of logical processors in the host, the Generation 1 VM creation will fail with Windows Server 2025. Older Windows Server versions, prior to Windows Server 2025, don’t have this issue because of a very small number of virtual processors set by default. See the Virtual processors settings (Generation 1) section for more information.
The following figure shows the failed message for Generation 1 VM creation when the logic processors in the host are more than 128. This information is not very clear. However, once we get such a failure, we can check with the number of logic processors of the host.
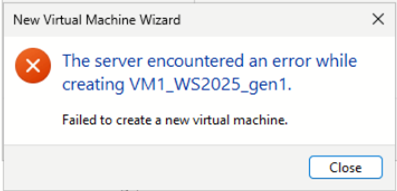
Figure 6. Failed Generation 1 VM creation with more than 128 logic CPUs in the host - Install the guest operating system for the VM:
- In Hyper-V Manager, right-click this new VM and select Connect.
- In the Virtual Machine Connection window, click Start.
- Install client OS for the VM.
Setup using PowerShell (Generation 1)
Hyper-V Manager's user-friendly interface makes it simple for beginners to get started and easy to create, manage, and monitor VMs. The only limitation is that users must perform the operations one by one. The more efficient way for multiple VM creation and configuration is using PowerShell commands, especially in the script and automation.
This example creates a Generation 1 VM named VM2_WS2025_gen1 that has 4 GB of memory.
PS> New-VM -Name "VM2_WS2025_gen1" -MemoryStartupBytes 4GB -Generation 1

Figure 7. Set up a new Generation 1 VM by PowerShell commands
When creating a new VM by PowerShell commands, if not specified for the generation, it will be a Generation 1 VM. Below is an example of creating a new VM and how to check its generation.
PS> New-VM -Name "VM3_WS2025" -MemoryStartupBytes 4GB
PS> Get-VM | format-list Name,Generation
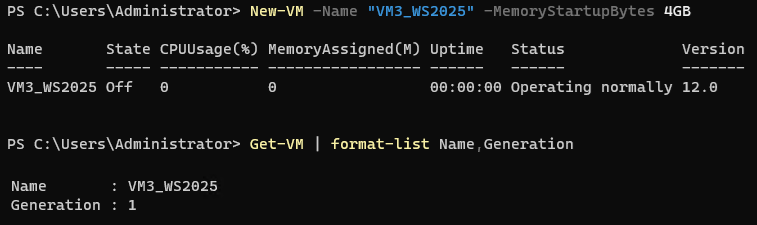
Figure 8. Default generation setting with VM creation by PowerShell commands
Virtual processors settings (Generation 1)
When creating or running a new VM, a certain number of virtual processors will be allocated from the host. The amount of virtual processors available is mainly determined by the number of cores available on the hardware. Each virtual CPU maps down to a physical core.
Hyper-V Manager doesn’t let you specify the number of virtual processors at VM creation time. In the Windows Server version prior to Windows Server 2025, the default number of virtual processors for VM is 1. After the VM is created, this number can be increased for more CPU resources depending on the generation, workloads of the VM, and the available hardware resources in the host. Windows Server 2025 brings us enhanced virtual processors allocating for VMs to offer better performance in Hyper-V Manager.
For a Generation 1 VM, whatever how many logic cores are available in the host, the maximum number that can be specified is 64. When creating a new Generation 1 VM by Hyper-V Manager, the default number of virtual processors will be the minimal value of half of the total logic processors of the host and 64. For example, if the host is configured with two 24C CPUs and the total logic processors are 96, the default number of virtual processors for Generation 1 VM created by Hyper-V Manager will be 48.
Figure 9 shows the processor setting for a Generation 1 VM created by Hyper-V Manager when the host is configured with two 32C CPUs and the logic processors are 128. If you try to change the number of virtual processors to more than 64, a pop-up alert “Out of Bounds” will tell you to specify a number between 1 and 64.
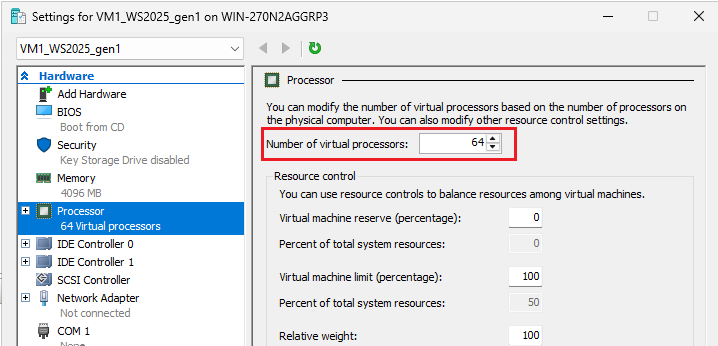
Figure 9. Virtual processors setting for a Generation 1 VM
When using PowerShell commands to create a Generation 1 VM, the default number of virtual processors is 1. You can change the virtual processors of VM using PowerShell command after it is created. Remember that the maximum count is 64 for Generation 1 VM. Below are examples of how to get and set the number of virtual processors of a VM.
PS> New-VM -Name "VM2_WS2025_gen1" -MemoryStartupBytes 4GB -Generation 1
PS> Get-VMProcessor -VMName "VM2_WS2025_gen1"
PS> Set-VMProcessor -VMName "VM2_WS2025_gen1" -count 64
PS> Get-VMProcessor -VMName "VM2_WS2025_gen1"
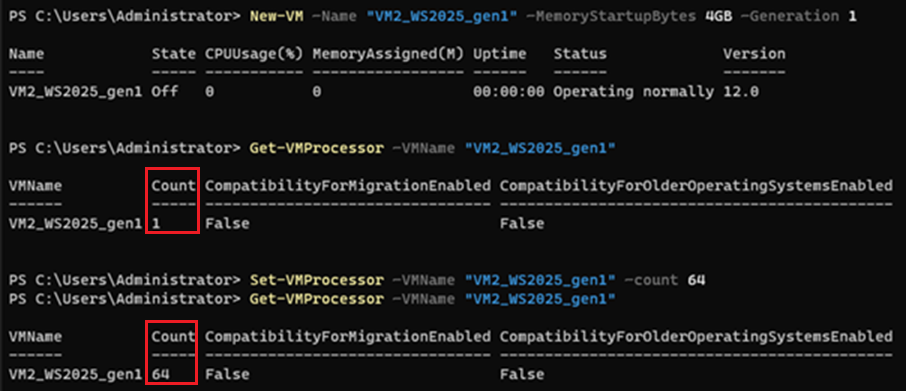
Figure 10. Change virtual processors setting by PowerShell commands
Generation 2 VM with Windows Server 2025
Generation 2 VMs are the newer iteration of virtual machines and are based on the Unified Extensible Firmware Interface (UEFI) firmware. This type of VM uses a more modern virtualized hardware layer to present improved virtualized devices to the guest operating system and only supports 64-bit guest operating systems.
Starting with Windows Server 2025, Generation 2 replaces Generation 1 as the default option in the New Virtual Machine. The benefits for the enterprise include the default use of Secure Boot to avoid malicious action on firmware at bootup, virtualization-based security, and better performance.
Setup using Hyper-V Manager (Generation 2)
The methods to create a Generation 2 VM are very similar to the ways for Setting up a Generation 1 VM except for the generation setting.
When creating a new Generation 2 VM through Hyper-V Manager, keep the default Generation 2 setting on the Specify Generation page.
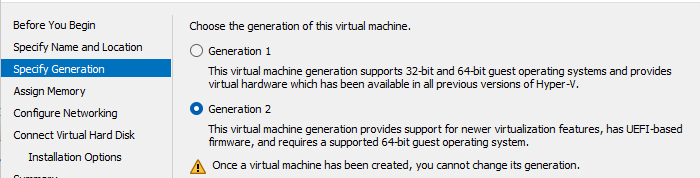
Figure 11. Default Generation 2 setting for VM in Hyper-V Manager
Setup using PowerShell (Generation 2)
When creating a Generation 2 VM by a PowerShell command remember to specify the Generation 2 setting explicitly.
The following command creates a Generation 2 VM named VM_WS2025_gen2 with 4 GB of memory:
PS> New-VM -Name "VM_WS2025_gen2" -MemoryStartupBytes 4GB -Generation 2

Virtual processors settings (Generation 2)
Windows Server 2025 provides significant virtual processors setting for Generation 2 VM for better performance. For Generation 2 VM, the maximum virtual processor number is 2048. When Hyper-V Manager creates this type of VM, the default number of virtual processors is about the half of the total logic processors available in the host.
The examples below are from the host Lenovo ThinkSystem SR645 V3 that is configured with two 96C AMD processors and the total logic processors are 384.
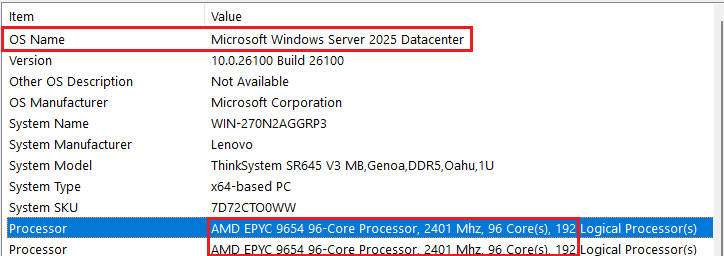
Figure 13. CPU cores of the host machine
We create a Generation 2 VM by Hyper-V Manager in this example server. After it is created, check the setting for the processor of the VM. You can find the number of virtual processors is 192 and the percent of total system resources is 50.
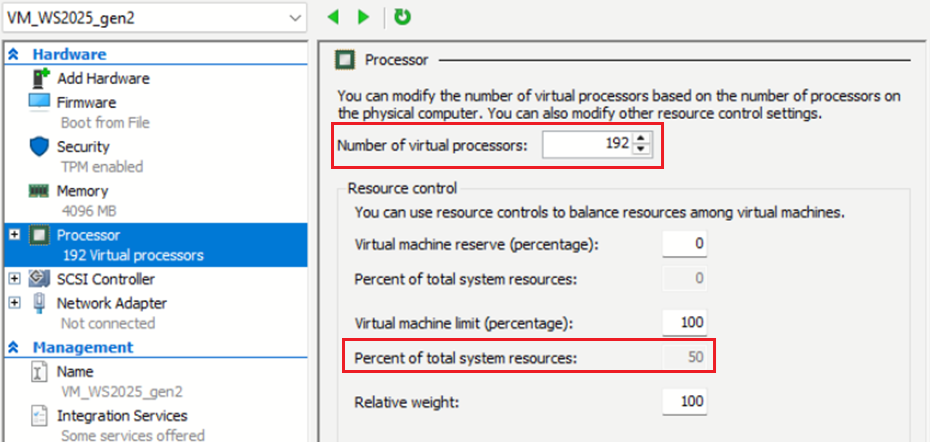
Figure 14. Default virtual processor setting for a Generation 2 VM created by Hyper-V Manager
At the Processors setting of the VM, we can change the number of virtual processors to be the number of total logic processors of the host, 384. Here, the percent of total system resources displays 100. The percentage of total system resources for a VM is a calculated value based on the number of allocated CPUs and the maximum limit set. The value 100 means the limit and we can’t specify more virtual processors.
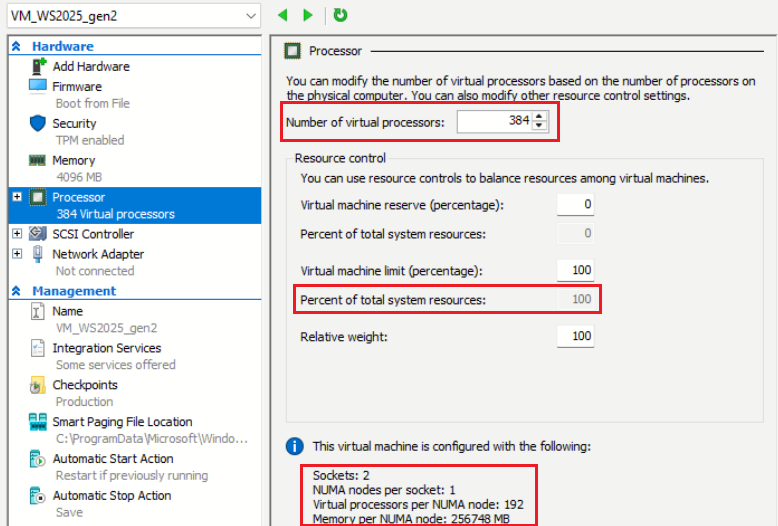
Figure 15. Change virtual processors setting for a Generation 2 VM by Hyper-V Manager
Save this change and start the VM, then, it can boot successfully. In the search box of the VM, run msinfo32 then check the processors on the displayed System Summary page, two 192 logic processors are listed.
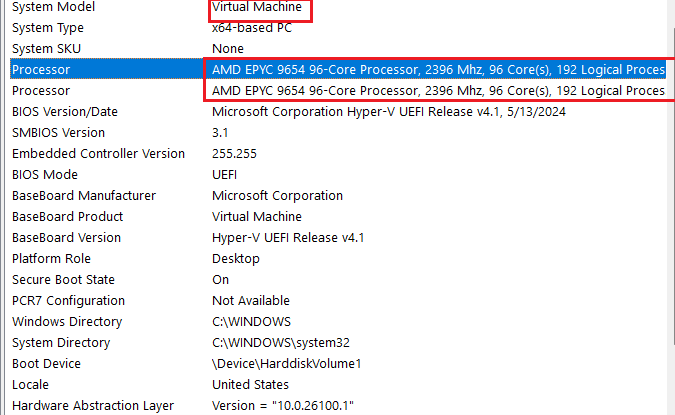
Figure 16. Virtual processor display after VM starts
Tip: For Generation 2 VMs, the maximum number of virtual processors allowed within Hyper-V Manager is 1024. If virtual processors are allocated by PowerShell commands, the maximum number of virtual processors is 2048.
Note: If the number of logical processors within the physical host is less than the number of allocated virtual processors, then VM initialization and start failure will occur with the following alert:
The processor settings for the virtual machine are incompatible with the host.
To resolve the issue, reallocate the number of virtual processors to a valid quantity, which is not more than the quantity of available logical processors.
Benefits of Generation 2 virtual machines
Creating a Generation 1 or Generation 2 VM depends on which guest operating system you want to install, the boot method you want to use to deploy the VM and the required scalability. If the boot method you want to use doesn’t support Generation 2, or an existing prebuilt virtual hard drive isn't compatible with UEFI, then a Generation 1 VM will need to be used.
Generally, a Generation 2 VM is recommended to take advantage of more advanced boot options, improved device support, faster boot times, high scalability, and more reliable security.
The following are functions only available in Generation 2 VMs:
- Enable secure boot and vTPM for a Generation 2 VM
- Deploy shielded VMs for your server
- Deploy Device Guard and Credential Guard for a Generation 2 VM
- Hyper-V scalability improvements in Windows Server 2025
- Virtual persistent memory support for a Generation 2 VM
The generation of VM cannot be changed once the VM is created. To upgrade a Generation 1 VM to a Generation 2 VM, you’ll need to create a new Gen 2 VM and manually migrate your data and settings over.
Enable secure boot and vTPM for a Generation 2 VM
Secure boot is enabled by default for a Generation 2 VM to help prevent unauthorized firmware, operating systems, or UEFI drivers from running at boot time. You can use secure boot with Generation 2 virtual machines that run Windows or Linux distribution operating systems. For Secure Boot Generation 2 Linux VMs, the UEFI CA Secure Boot template at Settings -> Hardware -> Security should be chosen before connecting or starting the VM, as shown in Figure 17.
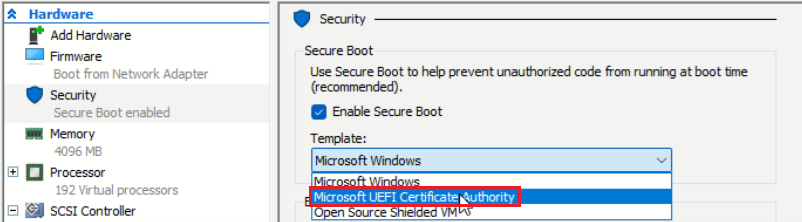
Figure 17. Microsoft UEFI CA template for Linux distribution OS
vTPM (virtual Trusted Platform Module) is a virtualized version of a hardware TPM 2.0 device. It serves as a dedicated secure vault for storing keys, certificates, and secrets, and it is very useful for VMs. We can enable vTPM for a Generation 2 VM in Settings -> Hardware -> Security of the VM, as shown in Figure 18.
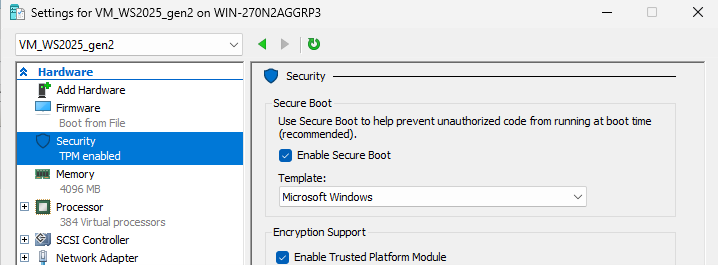
Figure 18. Enable secure boot and TPM for a Generation 2 VM
vTPM can also be enabled by the following PowerShell command.
PS> Enable-VMTPM -VMName "VM01"
After secure boot and TPM are enabled for the VM, start this VM, then the TPM 2.0 device will be found under the Device Manager of this VM, as shown in Figure 19.
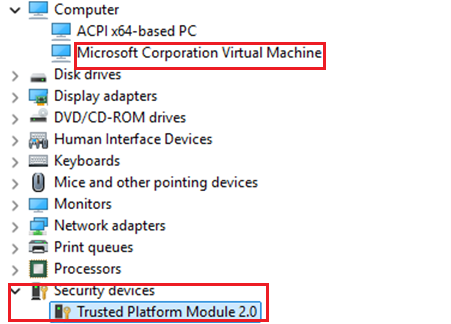
Figure 19. vTPM module in Device Manager
Windows 11: If a Generation 2 VM is expected to be installed with Windows 11, vTPM should be enabled first. Otherwise, the installation will fail with the message:
This PC doesn’t meet the minimum system requirements to install this version of Windows.
Deploy shielded VMs for your server
For more virtual machine security, use the Enable Shielding option in Hyper-V Manager to disable management features like console connection, PowerShell Direct, and some integration components. If you select this option, Secure Boot, Enable Trusted Platform Module, and Encrypt State and VM migration traffic options are selected and enforced. A shielded VM must be a Generation 2 VM. Figure 20 shows the setting for shielding VM in Hyper-V Manager.
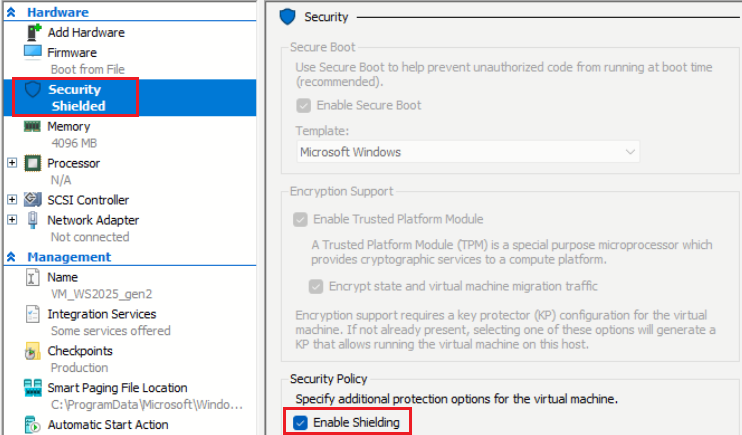
Figure 20. Shielded VM setting
You cannot connect to a shielded VM using a virtual machine connection. You can use a Remote Desktop Connection instead. For more details about setting up a shielded VM, see the Lenovo Press paper, "Introduction to Windows Server 2016 Shielded VMs":
https://lenovopress.lenovo.com/lp0540-introduction-to-windows-server-2016-shielded-vms
Deploy Device Guard and Credential Guard for a Generation 2 VM
Device Guard and Credential Guard are two important security features that use Virtualization-based Security (VBS) technology to leverage the virtualization extensions of the CPU and the hypervisor to protect critical processes and their memory against tampering from malicious attacks. Device Guard provides Hypervisor Code Integrity (HVCI) for stronger code-signing guarantees and the focus is on preventing malicious code from running. Credential Guard specifically isolates and protects user credentials stored in memory and helps minimize the risk of credential theft.
Both Device Guard and Credential Guard can also protect secrets in a Hyper-V VM, just as they perform on a physical machine. To implement these two features on a VM, the Hyper-V virtual machine must be Generation 2. Figure 21 reflects a VM running with both Device Guard and Credential Guard available on a supported host.
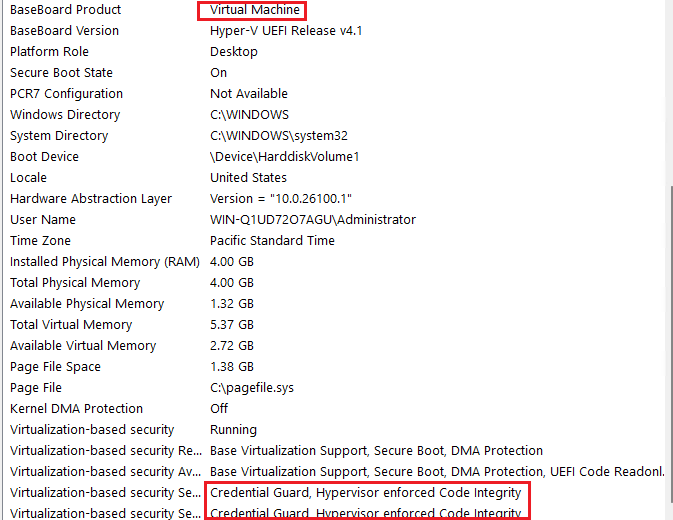
Figure 21. Deploy device guard and credential guard for a Generation 2 VM
Hyper-V scalability improvements in Windows Server 2025
Hyper-V's scalability improvements in Windows Server 2025 mainly include the following:
- VMs can support up to 2,048 virtual CPUs (compared to 64 with Generation 1).
- Maximum RAM of 240 TB for Generation 2 VMs (compared to 1 TB for Generation 1).
- 256 virtual SCSI disks per VM with four SCSI controllers for Generation 2 VM.
- Maximum virtual disk size of 64 TB when using VHDX format.
- Maximum of 68 virtual network interface cards per VM.
- Maximum of 64 nodes and 8,000 VMs in a failover cluster.
The big change is Windows Server 2025 supports up to 2,048 vCPUs for Generation 2 VMs, an increase from 1,024 in Windows Server 2022.
Note that 1,024 vCPUs are still the maximum in the UI, but PowerShell can be used to enable the full 2,048 vCPUs. Customers who require more comprehensive VMs to handle resource-intensive workloads related to AI applications or big data processing will benefit from these improvements. The high scalability above can only be reached with Generation 2 VMs.
Virtual persistent memory support for a Generation 2 VM
Persistent memory is a solid-state, high-performance, byte-addressable memory device. This type of memory technology can retain the content through power cycles. We can create a persistent memory device on an existing NTFS DAX volume and expose it to a Generation 2 VM, which enables Hyper-V VMs to benefit from the low latency byte-level addressability of the host device.
References
For more information, see these resources:
- Hyper-V technology overview
https://learn.microsoft.com/en-us/windows-server/virtualization/hyper-v/hyper-v-overview - System requirements for Hyper-V on Windows and Windows Server
https://learn.microsoft.com/en-us/windows-server/virtualization/hyper-v/system-requirements-for-hyper-v-on-windows - Should I create a Generation 1 or 2 virtual machine in Hyper-V
https://learn.microsoft.com/en-us/windows-server/virtualization/hyper-v/plan/should-i-create-a-generation-1-or-2-virtual-machine-in-hyper-v#creating-vms-with-more-than-64-logical-cpus - Plan for Hyper-V scalability in Windows Server
https://learn.microsoft.com/en-us/windows-server/virtualization/hyper-v/plan/plan-hyper-v-scalability-in-windows-server?pivots=windows-server-2025 - Generation 2 virtual machine security settings for Hyper-V
https://learn.microsoft.com/en-us/windows-server/virtualization/hyper-v/learn-more/generation-2-virtual-machine-security-settings-for-hyper-v - Introduction to Windows Server 2016 Shielded VMs
https://lenovopress.lenovo.com/lp0540 - Credential Guard overview
https://learn.microsoft.com/en-us/windows/security/identity-protection/credential-guard/ - Persistent memory devices for Hyper-V VMs
https://learn.microsoft.com/en-us/windows-server/virtualization/hyper-v/manage/persistent-memory-cmdlets
Author
Guiqing Li is a Windows Engineer working in the Lenovo Infrastructure Solutions Group based in Beijing, China. She has more than ten years of experience with driver development, and eight years of experience with Windows debugging.
Special thanks to the following people for their contributions and suggestions:
- Gary Cudak, Principal OS Engineer, ThinkAgile Development
- Boyong Li, Senior Engineer, OS Enablement
- Ronald Arndt Jr, Advisory Engineer, ThinkAgile Development
- David Watts, Lenovo Press
Trademarks
Lenovo and the Lenovo logo are trademarks or registered trademarks of Lenovo in the United States, other countries, or both. A current list of Lenovo trademarks is available on the Web at https://www.lenovo.com/us/en/legal/copytrade/.
The following terms are trademarks of Lenovo in the United States, other countries, or both:
Lenovo®
ThinkAgile®
ThinkSystem®
The following terms are trademarks of other companies:
AMD and AMD-V™ are trademarks of Advanced Micro Devices, Inc.
Intel®, the Intel logo is a trademark of Intel Corporation or its subsidiaries.
Linux® is the trademark of Linus Torvalds in the U.S. and other countries.
Microsoft, DAX, Hyper-V, PowerShell, Windows, and Windows Server are trademarks of Microsoft Corporation in the United States, other countries, or both.
Other company, product, or service names may be trademarks or service marks of others.
Configure and Buy
Please select a locale
Full Change History
Course Detail
Employees Only Content
The content in this document with a is only visible to employees who are logged in. Logon using your Lenovo ITcode and password via Lenovo single-signon (SSO).
The author of the document has determined that this content is classified as Lenovo Internal and should not be normally be made available to people who are not employees or contractors. This includes partners, customers, and competitors. The reasons may vary and you should reach out to the authors of the document for clarification, if needed. Be cautious about sharing this content with others as it may contain sensitive information.
Any visitor to the Lenovo Press web site who is not logged on will not be able to see this employee-only content. This content is excluded from search engine indexes and will not appear in any search results.
For all users, including logged-in employees, this employee-only content does not appear in the PDF version of this document.
This functionality is cookie based. The web site will normally remember your login state between browser sessions, however, if you clear cookies at the end of a session or work in an Incognito/Private browser window, then you will need to log in each time.
If you have any questions about this feature of the Lenovo Press web, please email David Watts at dwatts@lenovo.com.


